Upgrade MaixPy firmware
1. Connecting the board
Connect the Type C cable, one end to the development board, one end to the computer.
2. Install the driver
We need to install the serial port driver as the board is connected to the computer through the USB to serial converter. Install the driver according to the board's USB to serial port chip model.
In you are using
LinuxorMacand you don't want to usesudoevery time, add yourself to thedialoutusers group with the following command:sudo usermod -a -G dialout $(whoami)
2.1. For Dan Dock or Maix Bit
The CH340 chip is being used, Linux does not need to install the driver as the system already comes with it. Execute ls /dev/ttyUSB* to check if the device is found. If using Windows, search and download the drivers on the Internet, then open Device manager and look if the serial port is listed.
2.2. For Maix Go
An STM32 is being used to implement the serial port and the JTAG functionality.
By default, this STM32 chip is running a build of the open-ec firmware. If everything is right, one or two serial ports will appear. In linux the following two serial ports will appear: /dev/ttyUSB0 and /dev/ttyUSB1. Please use /dev/ttyUSB1 when downloading and accessing the serial port. Windows is similar.
If you need to re-burn this firmware, you can download it from GitHub or open-ec firmware, then use the STM32's SW pins (GND, SWDIO, SWCLK) from the ST-LINK connection board for programming. (The STM32 on the current version of the Go board does not support serial port burning. It can only be burned using ST-LINK. Please purchase it if you need it, or use a board with IO simulation such as the Raspberry Pi))
Currently, open-ec cannot simulate JTAG to debug the board. Use CMSIS-DAP to do so. You can download it from the official website and then burn it using an ST-LINK. Afterwards, /dev/ttyACM0 will appear under linux.
ST-LINK has a very complete description of the burning method of
STM32, please search for yourself.
Please note that updating the firmware of STM32 is not the same as updating the MaixPy firmware. Generally, you do not need to update the firmware of STM32. The default is enough. STM32 is just a USB to serial port tool! Do not be confused.
2.3. For the new Maixduino and Maix Bit versions that come with a microphone (using a CH552 chip)
For the boards with a CH552 chip, to get the USB serial port, FT2232 drivers need to be installed. Search yourself for FT2232 drivers. In those boards, the JTAG function is not available.
3. Get the upgrade tool
Download kflash_gui and you will get a zip file.
kflash_gui is cross-platform, it can work on multiple systems (including Windows, Linux, MacOS or even Raspberry Pi)
Extract the downloaded file to a folder, then double-click kflash_gui.exe to run the app.
4. Get firmware
- The release version of the firmware is downloaded from the GitHub page
- The automated builds can be downloaded from here
Firmware files have the .bin or .kfpkg extension
To package kfpkg files, check this link
Firmware naming instructions:
maixpy_v*_no_lvgl.bin: MaixPy firmware, without LVGL version. (LVGL is an embedded GUI framework, you need to use when writing the interface)maixpy_v*_full.bin: Full version of MaixPy firmware (MicroPython + OpenMV API + lvgl)maixpy_v0.3.1_minimum.bin: MaixPy firmware minimum set, not supported ´byMaixPy IDE, does not contain OpenMVrelated algorithmsface_model_at_0x300000.kfpkg: Face model, placed in address 0x300000, can be downloaded multiple times without conflictelf.7z: elf file, ordinary users do not care, used for crash debugging
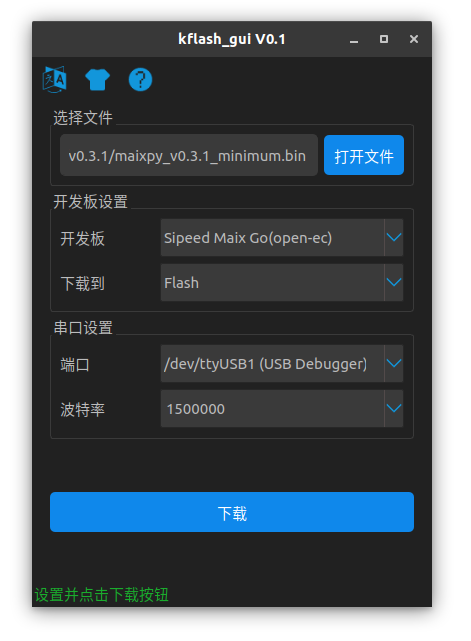
5. Download firmwre to the development board
Open
kflash_guiSelect the firmware, set the options and then click to download. For more features, or instructions on how to use the tool, check the kflash_gui project page

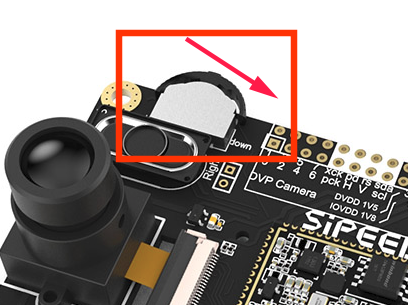
For the early
Maix Go, if the download fails, try holding the three-phase dial to thedownlocation during the download procedure.